Showing posts with label An Organic Adventure!. Show all posts

Tuesday, 24 November 2015

How to make a Scarecrow :)

Once we discovered the birds were trying to eat the seeds we'd just planted right out of the ground, we thought about a few ways in which to deter them. The most obvious seemed to be a scarecrow, which was an idea that thoroughly appealed to the smallest members of our family!

This is a great activity for kids of all ages, they can get involved in nearly every part of making a scarecrow and seem to particularly enjoy stuffing the hay in and drawing on the face.

Here is a bit of a step by step guide to how we went about it:

What we used:
- 2 fallen branches- one for the stand and one for the arms
- some old bailing twine 
- some nails/screws & a hammer/screwdriver
- an old pair of jeans/overalls
- a plastic bag stuffed with plastic bags
- a piece of cloth for the head
- a permanent marker
- a straw hat
- some safety pins, large and medium
- an old shirt
- some hay/straw
- some rope to secure the scarecrow to a fence
- some rope/ an old belt
- some old gloves
- some old boots/gumboots would be good too, but our scarecrow will have to wait for these!
- a post digger/spade to dig a hole
- 2 old bricks

How we made the scarecrow:
Firstly, I have to say that it would have been so much easier to use overalls rather than old jeans, but we didn't have any of those lying around and they were surprisingly difficult to find in our local Op Shops. 

If you have some, use overalls, they are much easier to keep in place!

Step 1- Make a cross with the 2 branches, using the shorter one for the arms, and tie them together using bailing twine. I also used a few nails underneath and above the 'arm' branch to make this more secure:


Step 2- Cut a hole in the crutch of the jeans/overalls and pull them onto the stand:


Step 3- Dig a hole at least 30cm deep for the stand and place it in the hole with an old brick on either side for extra support. Fill the dirt back in around the stand.


Step 4- Tie the bag of plastic bags onto the top of the stand to make a head:


Step 5- Place the cloth over the top and tie it over the bags:


Step 6- Use a couple of safety pins to secure the straw hat onto the head and draw on a face using permanent marker.

Step 7- Use the back belt loop of the jeans or make a small hole and use some rope/bailing twine to tie the jeans to the arm branch so they don't fall down:


Step 8- Use some bailing twine to tie off the bottom of the legs:


 Step 9- Put the shirt onto the arm branch and do up most of the buttons:


Step 10- Put the gloves on the end of the arms, making sure that the shirt sleeves are tucked inside them. Tie on the gloves using bailing twine.

Step 11- Stuff the scarecrow with hay or straw. Start with the legs, then stuff the arms. Secure the shirt to the jeans using safety pins and open the top 2 buttons of the shirt. Stuff the shirt with hay. Feel free to pack it in quite tightly as it will settle and flatten over time.

Step 12- Tie some rope or an old belt around the middle to keep things in place a bit and use more rope or bailing twine to tie this rope to a fence for support if you can:


Step 13- Tuck some hay under the hat for hair, don't worry if it's a bit messy, it all adds to the charm!

Step 14- If you have some old boots place them on the ground and tuck the legs in, or tie them onto the bottom of the legs if you have shorter boots.


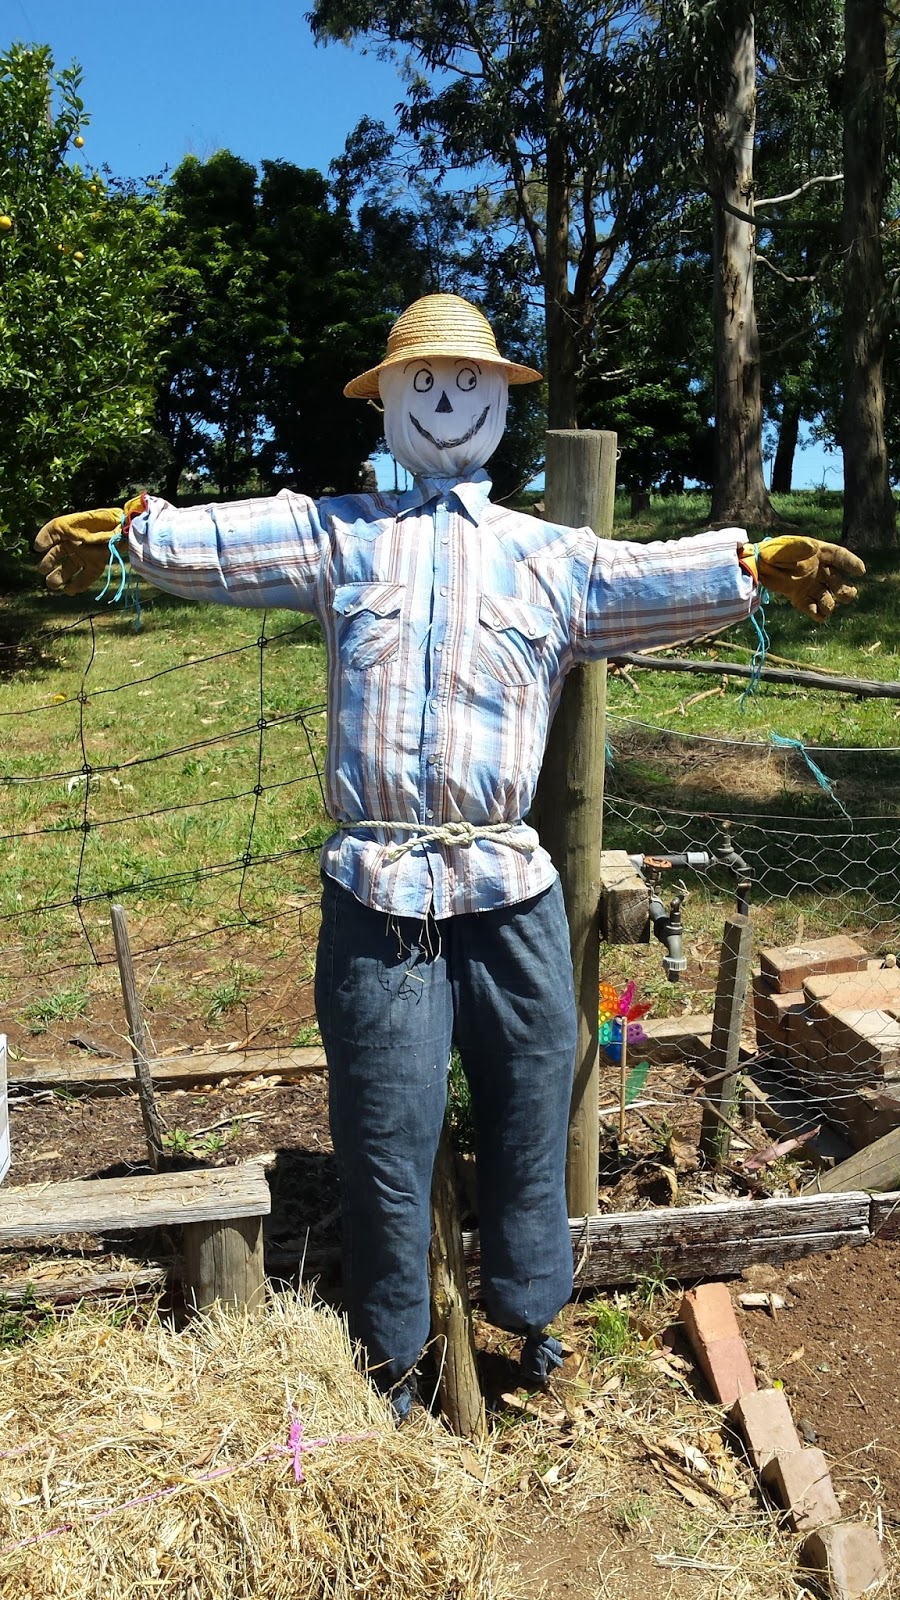
And BINGO! One scarecrow!

We'll be building another one in the orchard at some point, as soon as I find some old overalls... :)

Wednesday, 4 November 2015

Progress in The Kitchen Garden!

Wow!!

We have been so busy in the garden this past month and the changes are amazing!

I have removed the old trellises held in place by star pickets (only just visible to the far left in the pic below) with the aid of the neighbours' star picket remover (didn't know there was such a thing up to that point!).


We have also filled the kitchen garden with new garden beds and planted them out, so finally we have:

The bean teepee with 2 different types of beans- Dutchdry Pole and Sex Without Strings

In the far side bed:
- a herb garden containing stevia, peppermint, curry plant, thyme, rosemary, continental parsley and an old rhubarb plant that has survived from the last time this was a veggie patch! I have also planted curly parsley and basil seeds and a small Vietnamese mint plant.
- Romanesco broccoli
- Onions
- Broadbeans
- Oregon snow peas
- Dwarf snow peas
- Lettuce
- Strawberries
- Tatsoi
- Tri-colour heritage carrots
- Dwarf rhubarb
- Sugarloaf cabbages
- Garlic
(the parsnips and chives I planted in this bed don't appear to have grown at all, so will have to put something else in there soon).

In Pallet bed 1:
- Carrots, (Danver, Baby and All Seasons)
- Sugarloaf Cabbage
- Leeks
- Parsnips
- Raddishes
- Beetroot (Egyptian and Globe)
- Zucchini Green
- Rhubarb
- Mini Cucumbers

In Pallet bed 2:
- Mini Cucumbers
- Spring Onions
- Parsnips
- Perpetual Spinach
- Zucchini Black Beauty
- Mini Cauliflower
(there is still a small patch for something else in this one too)

In Pallet bed 3:
- Celery
- Mesclun
- Watermelon, Ice Cream
- Rockmelon, Edens Gem


In a large square bed we knocked together we are doing a 3 sisters garden bed with:
- Corn, Golden Bantam
- Beans, Dutchdry Pole and Sex Without Strings
- Pumpkin, Musque de Provence

In a bed along the Western border I planted 2 different types of Asparagus- Sweet Purple and Fat Bastard.

This bed also contains my potato growing experiment, a few Nicola potatoes in an open-ended half drum, which I plan to top up with tyres and mulch as the potatoes grow.


The Northern border was mainly taken up by weeds and the passionfruit vine, which hadn't been pruned in a while (4 years or so)...


So I trimmed it back and cleared the area beneath....


And knocked together another 2 narrow beds with a path down the middle. This bed gets a bit more shade than the others, so I looked up which plants might do OK in partial shade and planted out with:

- Lettuce, Royal Oakleaf
- Broccoli, Green Sprouting
- Cabbage, Red Drumhead
- Broccoli, De Cicco
The garlic down the end here was the first thing I planted and is still doing OK (I think!!).


This is another experiment, with tomatoes.


We have been building a small hothouse for seedlings, but it isn't finished yet and I really wanted to get some tomatoes in the ground, so I planted some seeds and popped a couple of salad containers with holes drilled in them over the top and pegged them down with wire.

In the centre is a bucket with holes drilled around the bottom and the top and filled with compost. The idea is to put water in the bucket and let gravity and the plants look after the watering.

When the seedlings are larger I will remove the covers and put up a circular wire support for the plants, fingers crossed!

I also planted basil and marigold seeds around the edges of the tomato bed.

The Kitchen Garden has also had a kaffir lime bush and some sunflowers added to the South-Western corner.

Looking forward to posting updated photos when everything starts growing!! :)

Tuesday, 13 October 2015

Cloudehill Gardens- Olinda

Looking forward, we have big plans to divide our little farm into a few distinct areas: 

One will include the house, sheds, outdoor entertaining and park-like lawn area.

The orchard, olive grove, food forest, beehives and berry vines will be in another area to the north.

The organic fruit and vegetable garden beds and chicken coop will make up the proper 'farm' area of about 3 acres. 

The vegetable beds at Cloudehill

 There is a paddock of about 4 acres with a dam, which will either be a pony paddock or a small vineyard depending on how things work out, and we hope that a separate 2/3rds of an acre allotment will be a lovely farm stay, built using natural methods.

Love the paving and pebbles here...

Perhaps the grandest plan though, is the acre and a half that I would like to turn into a formal garden, full of flowers and beautiful places to relax and enjoy.

Bricks are used liberally and I love the structured plants either side of the stairs.

When I look at the bare paddocks we have right now, all this seems like a very big dream, but then I remind myself that huge cities were built one brick at a time and just keep working on it, tiny bit by tiny bit.


To maintain the energy and motivation I like to visit beautiful, already well established gardens. Where better to soak up the vibes, gain knowledge of what plants grow best when and where and of course...steal ideas!

The photos are from our recent visit to Cloudehill Garden in Olinda , a magical place where much inspiration was gained. A lot of the pathways and retaining walls have been made using bricks and volcanic rock, readily available on many of the 'free to good home' websites. I cannot wait to use so many of these ideas in our garden!


Saturday, 10 October 2015

Natural Pest Repellents

We used to live in the Dandenong Ranges, a beautiful place which is green, lush....and filled with spiders, rats and numerous other pests that you'd prefer not to have in your house.

We lived in a wooden house with more gaps than even the dullest spider would ever need to gain entry. Needless to say we had to deal with quite a few. I wish I'd thought to look up a few of these natural pest repellent recipes then.

**Spiders don't like Peppermint apparently- so grow some on your window sills or by the door if you have the right amount of sunlight, or you can do what we did and spray the outside and inside of your window and door frames with Peppermint essential oil. 

I used about 50 drops in about 100ml of water. It isn't water soluble so you'll need to shake the bottle often as you spray. You will be left with a delightfully minty fresh and (hopefully) spider-free home.


** For a natural Mosquito repellent, blend cinnamon, clove, geranium, peppermint, and lemongrass essential oils. OR, try cintronella and lemongrass oils.

** Apparently Peppermint Oil is also a Mouse and Rat deterrent, but you need to re-spray fairly frequently, every 3 days or so. Blocking all gaps and keeping food secured in glass containers is probably a better bet though. You might consider growing peppermint near your compost and chicken pens though, mice and rats might not move in quite so readily.

Now that we live in beautiful Gippsland hills, Snakes are now also a concern. We have used 'Snake Chasers'- available at Diggers- which are plastic stakes you stick in the ground to emit a pulse every 30 seconds to deter snakes. These are about $35 each (and then you need about $15 worth of batteries to power them but they should last a year) and cover an area of about 300 metres square.


In addition a neighbour forwarded me a natural snake repellent recipe recently, so I'm going to give this a go too...can't be too careful. 

Sunday, 4 October 2015

Weeding, progress & a 3 sisters garden


So, weeding is not the most interesting task, but when it comes to organic gardening you just have to accept that is a fundamental part of the process. 

Before weeding....

I haven't done a lot of weeding in the side veggie bed because... well I didn't know what was an emerging vegetable seedling and what was a weed!

Anyway, the broccoli, carrots, sugarloaf cabbage, tatsoi and onions are all starting to come up and I can tell which is which is which now so it was time to get into the weeding. 

It was surprisingly satisfying to see a (largely) weed-free bed at the end of the day. 

And after weeding...
With the weather drying out a little sooner than expected this year, I hope that this will mean that the veggies get the majority of the available water and nutrients in the soil and not the weeds.

I have also put in some new veggies:

- Celery
- Mesclun
- Carrots- Baby, Danver & All seasons
- Beetroot- Globe & Egyptian
- Leeks
- Zucchini- Black Beauty & Garden Green
- Cucumbers - Mini Munchers
- Spring Onion
- Radishes
- Parsnips

I even managed to source a few seed potatoes from a lovely local business- Jones Potatoes in Warragul, who very kindly dug out a few different sorts for me an gave me planting instructions to go with them!

I have experimented with a few by trying to grow them in this half of an old feed barrel that I found in the shed. I'm hoping to use it like the tyre system and will add a couple of old tyres to the top when (and if) they grow.

I shared some with a neighbour because I need to dig furrows for the rest of them and that will be a bit of a mission. We also had a chat about my next project, which is a traditional companion planting garden of the '3 sisters', Corn, Beans and Squash, or Pumpkin. I have gone with a non-hybrid heritage seed for the corn 'Golden Bantam' and need to have the same type of corn growing in the immediate area to prevent cross-pollination, so I'm grabbing some for the neighbours next time I'm at the Diggers. 

The idea is that the corn provides something for the beans to grow up, the beans add nitrogen to the soil and the squash shades out the weeds. 

I found this on a facebook post (gotta love it) and these are the instructions:
1/ Plant corn when the frosts have passed
2/ Plant the pole beans when the corn is 5 inches high
3/ Plant the squash seeds one week later

I'll be doing this in the next 2 weeks, so will post with progress.


Thursday, 24 September 2015

Re-purposing in the Garden


The jet ski pallets
Ok, so I am not generally a fan of buying new building materials.

With so many things out there in the world already, with a bit of imagination, you can often turn something someone else doesn't want into something you can use.

I am always happy to scan the freebie websites, grab something off the side of the road or take things friends and family are chucking out, and make them into things I can use.

I thought I'd post a few examples with pics of what I've used in the garden.

The first (and definitely the most difficult) were the garden beds. These started life as shipping containers for jet skis. A motorcycle & jet ski shop posted them on Gumtree for free and I immediately saw them as garden beds.

The trouble started when my husband & I went to collect them. Not only were they too big to fit in our large box trailer, they were so heavy (about 50kg) the two of us needed some help to get them on top of the trailer and strap them down.

I drove them home like this (about 130km) and then accepted the help of a neighbour with forks on the tractor to lift them off the trailer and get them into a paddock where I intended to use them. They sat there for a month and a half until I eventually decided I wanted to use them in the kitchen garden after all.

I managed to strip all the internal timber from one pallet using a handsaw, nearly doing my back a damage in the process, and then asked a friend with a chainsaw to do the other two (which she managed in about 10 minutes as opposed to my hour and a bit!).

We dragged the wretched things into the the kitchen garden, my husband and I knocked & unbolted the last bits of wood from the frames and dug them into place.

OMG, what a mission! I would have been better off just knocking together garden beds out of the timber laying around in the shed, but anyhoo, it's done now.

Garden beds in place, carpet used to kill weeds, old ladders used as climbing frames for plants.
And they DO make really great garden beds. I even used the bits of carpet off these pallets to lay on certain areas of the garden to kill the weeds.

But it's not always this tricky. I needed some arches/climbing frames for my climbing veggies, so I dragged two rotten old ladders out of the hayshed, dusted them off, used some wire and string to create a net of sorts and dug the legs into place.

Old ladders given a new life.
Hopefully, these will have zucchini and cucumbers growing up them in no time.

Some more simple examples are the used bricks my mother-in-law had lying around. These have made decorative edging for more garden beds and the border around the bean teepee (so far). 

And of course, eggshells should not be wasted whilst you have lettuce growing (or any other plants that attract slugs and snails). 

Save them up and, once they're dry, crush them finely and sprinkle them liberally around your plants. I asked a mini helper with tiny gumboots to stomp on them for me and was told it was fun :) 

And of course, why buy fancy tags/naming stakes for your veg when you have sticks, a stanley knife and a permanent marker on hand? 
Just shave off the end, write whatever type of seed you have planted on the white bit and stick it in the ground. Perfect.

Sometimes re-purposing turns out to be more trouble than it's worth, but not very often. It's a great way to use what you have, save stuff from going into landfill, save cash and engage your creativity, all at once.


Sunday, 20 September 2015

The Bean Teepee- Edible Cubby!

Dig in a large stick.
Found this great idea in Millie Ross's book, The Thrifty Gardener:

A Bean Teepee Cubby!

The idea is to grow your beans in a teepee shape.

This gives your beans something to climb up and your kids somewhere to play whilst you're working in the garden.

First, mark out a 2x2m square space.

Find a large stick- have a look at your local park for one that has fallen from a tree and trim off all the smaller branches with a pruning saw.

Dig a 50cm deep hole to bury it in so it is nice and solid.

Dig a circular mound about 1 metre out from the stick all the way around, working in some compost.

Form a mound about 1 metre out from the stick in a circle.

Form a Teepee shape with the strings.
Tie a doubled-over length of string around a brick and put it on the ground outside the mound- Millie suggests plastic string as jute string can rot under the bricks, but we only had cotton string so we'll have to take our chances! You can use tent pegs of you don't have bricks.

Continue this around the stick to form a teepee frame, leaving about 40-50cm between each string and leaving a space for a doorway.

Soak the beans in water overnight. We used 2 different types for some variety and a longer growing season- 'Dutchdry pole beans' from The Briars' collection of heritage seeds, and an interesting one from the Digger's club called 'Sex Without Strings'.


Dutch Dry Pole Beans

Plant 2 or 3 beans at the base of each string and water in, but don't water again after that until you see a sprout.

Sex Without Strings from the Diggers' heritage collection.
The little plants might need a bit of help to find the string, so you might need to use a twig to prop them up a little and guide them onto the string but after that they should climb up the string all by themselves.

Once you have a healthy 10cm plant, pull out the smallest ones and just leave the one strongest looking plant at the bottom of each string.

For a bit of extra fun, I planted some Marigold 'Red Marietta' seeds in the gap between each string.

This means there should be pretty little red and yellow flowers around the base of the cubby too.

I'm not sure when we'll have a cubby covered in beans but the packet says 9 weeks til harvest.

I'll post again with pictures when we do!


Wednesday, 16 September 2015

Spring has sprung!


Some type of magnolia?
Spring is finally here and it is such an exciting time in the garden!


Not only is is time to plant so many vegetables, but there are flowers popping up out of nowhere on what seems like a daily basis.
Some kind of giant camelia
Our own red carpet..


The previous owners of our house obviously enjoyed gardening and have planted so many amazing things, many of which I cannot identify.

Mystery Orchid...
A pretty little blue flower (?)
Freesias
I was delighted to discover orchids in the garden the other day, the freesias are blooming and smell incredible and there is an amazing tree filled with yellow flowers near the water tank...
Yellow flowers covering a tree
Not sure what it is.


A green-thumbed friend of mine believes that these are some kind of insect-eating plant...


Tuesday, 15 September 2015

Growing Native Bush Spices- Niche Market

Bush Spices
As you can imagine, starting an organic farm has put me on a steep learning curve. I might have signed up to a lengthy and expensive course in horticulture, but instead I have been seeking out as many cheap and free short courses as I can to learn what I need to make this lifestyle venture successful.

Courses have been available via the Digger's Club for a small fee, or for free via libraries, councils and various community groups.
Leonie Parker

In the last 11 months, I have completed short courses in:
- Superadobe natural building
- Keeping chickens
- Starting a successful small business
- Growing a Kitchen Garden
- Moon Planting
- Sowing Garlic
- Soil Health
- Composting & Worm Farms
- Grant Application Writing
- Citrus Growing and Care
- Using Social Media in your business.
- Growing Native Australian Bush Spices for Market

I have courses in Event Planning, Beekeeping and Growing Australian Native Plants from Seed coming up within the next month and really looking forward to those.

Here are some pics from the Growing Native Australian Bush Spices for Market course, held at Leongatha library by Leonie Parker from Brushtail Bush Foods.

She shared pictures showing the transformation of her 40 acre property in Gippsland from paddocks to a garlic and passion fruit growing venture (which didn't work out) to a much more successful venture growing native bush spices.

Mountain Pepper

Some of the most successful plants she has grown are Mountain Pepper, of which both the berries and leaves can be harvested for use just like conventional pepper, Strawberry Gum and Round Leaf Mint.

Round Leaf Mint
These are sold to chefs, companies who turn them into value-added products such as syrups and spice mixes and at Farmer's Markets as dried spices.

The downside is that you need to harvest quite a lot of the raw product to end up with relatively little dried spice (1kg of harvested mountain pepper leaves will yield 300grams of dried spice) .

The upside is that there is no need to use any kind of pesticide, herbicide or fertilizer, due to the fact that these are native plants.

I am seriously considering adding some of these plants to our property.

Lemon Myrtle (left) and Warrigal Greens (right)