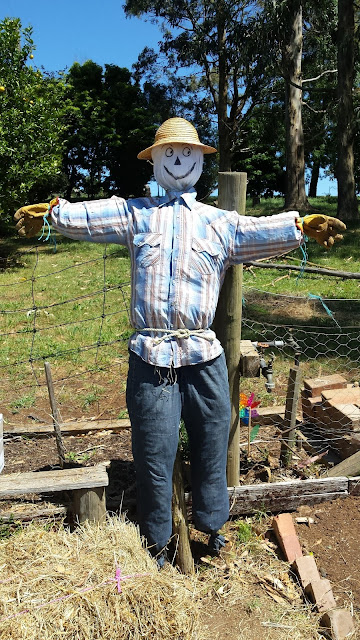
This is a great activity for kids of all ages, they can get involved in nearly every part of making a scarecrow and seem to particularly enjoy stuffing the hay in and drawing on the face.
Here is a bit of a step by step guide to how we went about it:
What we used:
- 2 fallen branches- one for the stand and one for the arms
- some old bailing twine
- some nails/screws & a hammer/screwdriver
- an old pair of jeans/overalls
- a plastic bag stuffed with plastic bags
- a piece of cloth for the head
- a permanent marker
- a straw hat
- some safety pins, large and medium
- an old shirt
- some hay/straw
- some rope to secure the scarecrow to a fence
- some rope/ an old belt
- some old gloves
- some old boots/gumboots would be good too, but our scarecrow will have to wait for these!
- a post digger/spade to dig a hole
- 2 old bricks
How we made the scarecrow:
Firstly, I have to say that it would have been so much easier to use overalls rather than old jeans, but we didn't have any of those lying around and they were surprisingly difficult to find in our local Op Shops.
If you have some, use overalls, they are much easier to keep in place!
Step 1- Make a cross with the 2 branches, using the shorter one for the arms, and tie them together using bailing twine. I also used a few nails underneath and above the 'arm' branch to make this more secure:
Step 2- Cut a hole in the crutch of the jeans/overalls and pull them onto the stand:
Step 3- Dig a hole at least 30cm deep for the stand and place it in the hole with an old brick on either side for extra support. Fill the dirt back in around the stand.
Step 4- Tie the bag of plastic bags onto the top of the stand to make a head:
Step 5- Place the cloth over the top and tie it over the bags:
Step 6- Use a couple of safety pins to secure the straw hat onto the head and draw on a face using permanent marker.
Step 7- Use the back belt loop of the jeans or make a small hole and use some rope/bailing twine to tie the jeans to the arm branch so they don't fall down:
Step 8- Use some bailing twine to tie off the bottom of the legs:
Step 10- Put the gloves on the end of the arms, making sure that the shirt sleeves are tucked inside them. Tie on the gloves using bailing twine.
Step 11- Stuff the scarecrow with hay or straw. Start with the legs, then stuff the arms. Secure the shirt to the jeans using safety pins and open the top 2 buttons of the shirt. Stuff the shirt with hay. Feel free to pack it in quite tightly as it will settle and flatten over time.
Step 12- Tie some rope or an old belt around the middle to keep things in place a bit and use more rope or bailing twine to tie this rope to a fence for support if you can:
Step 13- Tuck some hay under the hat for hair, don't worry if it's a bit messy, it all adds to the charm!
Step 14- If you have some old boots place them on the ground and tuck the legs in, or tie them onto the bottom of the legs if you have shorter boots.
And BINGO! One scarecrow!
We'll be building another one in the orchard at some point, as soon as I find some old overalls... :)


No comments:
Post a Comment