Wednesday, 25 November 2015

Making Goat's Milk Cheese

Making cheese is one of those things I've never done before because I thought it would be something that a) was really complicated, b) time-consuming and c) require special equipment.

But I saw some goat's milk on sale when I was shopping and decided to buy it, hoping to find a simple recipe for making goat's cheese.

Luckily, I found one that was perfect online, thanks to Roxanne McCoy, from Screamin' Oaks Farm in Kansas (great name for a property!).

She keeps goats and shared this simple recipe. It doesn't use a culture so it is technically more of a curd than a cheese and it only keeps in the fridge for a week, so best not to make a massive batch.

I have changed this to metric and reduced the amounts of each ingredient:

What you need:
- 1 litre of full cream goat's milk
- 17mls apple cider vinegar
- 1/2 teaspoon salt
- a saucepan
- a candy thermometer
- a spoon for stirring
- a piece of calico (I re-used a clean calico flour bag)
- kitchen string

To store:
- baking paper
- aluminium foil
OR a ceramic cheese pot

How To Make Goat Cheese:

Step 1 - Attach the thermometer to the side of the saucepan and tip the goat's milk into the saucepan. The bottom 2 inches of the thermometer should be in the milk.

Step 2 - Heat the milk to 85 degrees Celsius or 185 degrees Fahrenheit.

Step 3 - Add 17mls of apple cider vinegar to the milk- it should curdle a bit. Add the salt.


Step 4 - Keep it at this temperature for 10-15 minutes, stirring constantly. My hotplates kept raising the temperature, so I had to take the saucepan off the heat and return it a few times.

Step 5 - Line a colander or sieve with calico and put it in the sink.

Step 6 - Pour the milk mixture into the calico. You will note that the solid white parts stay in the calico and the clear liquid will run out and down the sink.


Step 7 - Tie the calico together with cotton string and hang the cheese to drip for a couple of hours.


Step 8 - When it has stopped dripping, lay two 30cm x 30cm squares of baking paper on the bench. Tip half of the mixture on each square of paper. Sprinkle with a pinch of salt. Add any flavours you might like, chopped chives, dill, caraway seeds...whatever you fancy.


Step 9 - Fold the baking paper over the cheese and roll it like a sausage. Then twist both sides of the paper quite tightly, so that it forms a nice firm roll.

Step 10 - Wrap in aluminium foil to keep the shape and refrigerate.

Enjoy!!


Tuesday, 24 November 2015

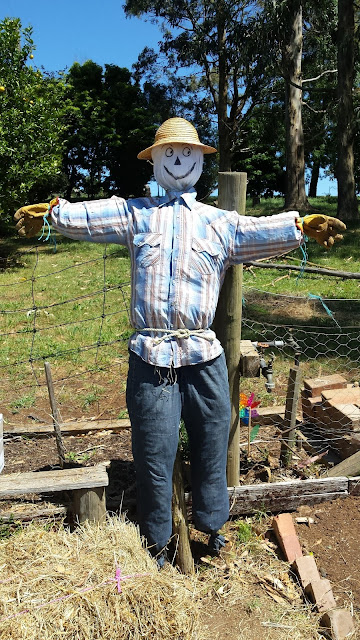
How to make a Scarecrow :)

Once we discovered the birds were trying to eat the seeds we'd just planted right out of the ground, we thought about a few ways in which to deter them. The most obvious seemed to be a scarecrow, which was an idea that thoroughly appealed to the smallest members of our family!

This is a great activity for kids of all ages, they can get involved in nearly every part of making a scarecrow and seem to particularly enjoy stuffing the hay in and drawing on the face.

Here is a bit of a step by step guide to how we went about it:

What we used:
- 2 fallen branches- one for the stand and one for the arms
- some old bailing twine 
- some nails/screws & a hammer/screwdriver
- an old pair of jeans/overalls
- a plastic bag stuffed with plastic bags
- a piece of cloth for the head
- a permanent marker
- a straw hat
- some safety pins, large and medium
- an old shirt
- some hay/straw
- some rope to secure the scarecrow to a fence
- some rope/ an old belt
- some old gloves
- some old boots/gumboots would be good too, but our scarecrow will have to wait for these!
- a post digger/spade to dig a hole
- 2 old bricks

How we made the scarecrow:
Firstly, I have to say that it would have been so much easier to use overalls rather than old jeans, but we didn't have any of those lying around and they were surprisingly difficult to find in our local Op Shops. 

If you have some, use overalls, they are much easier to keep in place!

Step 1- Make a cross with the 2 branches, using the shorter one for the arms, and tie them together using bailing twine. I also used a few nails underneath and above the 'arm' branch to make this more secure:


Step 2- Cut a hole in the crutch of the jeans/overalls and pull them onto the stand:


Step 3- Dig a hole at least 30cm deep for the stand and place it in the hole with an old brick on either side for extra support. Fill the dirt back in around the stand.


Step 4- Tie the bag of plastic bags onto the top of the stand to make a head:


Step 5- Place the cloth over the top and tie it over the bags:


Step 6- Use a couple of safety pins to secure the straw hat onto the head and draw on a face using permanent marker.

Step 7- Use the back belt loop of the jeans or make a small hole and use some rope/bailing twine to tie the jeans to the arm branch so they don't fall down:


Step 8- Use some bailing twine to tie off the bottom of the legs:


 Step 9- Put the shirt onto the arm branch and do up most of the buttons:


Step 10- Put the gloves on the end of the arms, making sure that the shirt sleeves are tucked inside them. Tie on the gloves using bailing twine.

Step 11- Stuff the scarecrow with hay or straw. Start with the legs, then stuff the arms. Secure the shirt to the jeans using safety pins and open the top 2 buttons of the shirt. Stuff the shirt with hay. Feel free to pack it in quite tightly as it will settle and flatten over time.

Step 12- Tie some rope or an old belt around the middle to keep things in place a bit and use more rope or bailing twine to tie this rope to a fence for support if you can:


Step 13- Tuck some hay under the hat for hair, don't worry if it's a bit messy, it all adds to the charm!

Step 14- If you have some old boots place them on the ground and tuck the legs in, or tie them onto the bottom of the legs if you have shorter boots.


And BINGO! One scarecrow!

We'll be building another one in the orchard at some point, as soon as I find some old overalls... :)

Wednesday, 4 November 2015

Progress in The Kitchen Garden!

Wow!!

We have been so busy in the garden this past month and the changes are amazing!

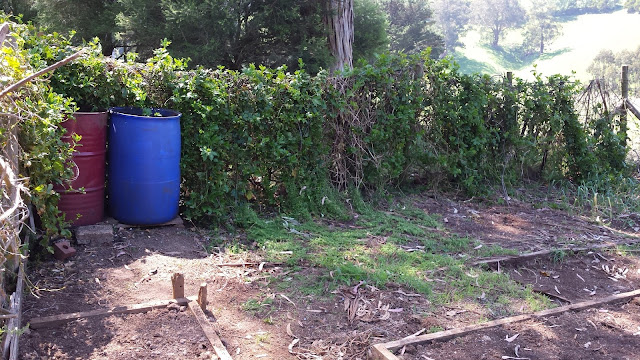
I have removed the old trellises held in place by star pickets (only just visible to the far left in the pic below) with the aid of the neighbours' star picket remover (didn't know there was such a thing up to that point!).


We have also filled the kitchen garden with new garden beds and planted them out, so finally we have:

The bean teepee with 2 different types of beans- Dutchdry Pole and Sex Without Strings

In the far side bed:
- a herb garden containing stevia, peppermint, curry plant, thyme, rosemary, continental parsley and an old rhubarb plant that has survived from the last time this was a veggie patch! I have also planted curly parsley and basil seeds and a small Vietnamese mint plant.
- Romanesco broccoli
- Onions
- Broadbeans
- Oregon snow peas
- Dwarf snow peas
- Lettuce
- Strawberries
- Tatsoi
- Tri-colour heritage carrots
- Dwarf rhubarb
- Sugarloaf cabbages
- Garlic
(the parsnips and chives I planted in this bed don't appear to have grown at all, so will have to put something else in there soon).

In Pallet bed 1:
- Carrots, (Danver, Baby and All Seasons)
- Sugarloaf Cabbage
- Leeks
- Parsnips
- Raddishes
- Beetroot (Egyptian and Globe)
- Zucchini Green
- Rhubarb
- Mini Cucumbers

In Pallet bed 2:
- Mini Cucumbers
- Spring Onions
- Parsnips
- Perpetual Spinach
- Zucchini Black Beauty
- Mini Cauliflower
(there is still a small patch for something else in this one too)

In Pallet bed 3:
- Celery
- Mesclun
- Watermelon, Ice Cream
- Rockmelon, Edens Gem


In a large square bed we knocked together we are doing a 3 sisters garden bed with:
- Corn, Golden Bantam
- Beans, Dutchdry Pole and Sex Without Strings
- Pumpkin, Musque de Provence

In a bed along the Western border I planted 2 different types of Asparagus- Sweet Purple and Fat Bastard.

This bed also contains my potato growing experiment, a few Nicola potatoes in an open-ended half drum, which I plan to top up with tyres and mulch as the potatoes grow.


The Northern border was mainly taken up by weeds and the passionfruit vine, which hadn't been pruned in a while (4 years or so)...


So I trimmed it back and cleared the area beneath....


And knocked together another 2 narrow beds with a path down the middle. This bed gets a bit more shade than the others, so I looked up which plants might do OK in partial shade and planted out with:

- Lettuce, Royal Oakleaf
- Broccoli, Green Sprouting
- Cabbage, Red Drumhead
- Broccoli, De Cicco
The garlic down the end here was the first thing I planted and is still doing OK (I think!!).


This is another experiment, with tomatoes.


We have been building a small hothouse for seedlings, but it isn't finished yet and I really wanted to get some tomatoes in the ground, so I planted some seeds and popped a couple of salad containers with holes drilled in them over the top and pegged them down with wire.

In the centre is a bucket with holes drilled around the bottom and the top and filled with compost. The idea is to put water in the bucket and let gravity and the plants look after the watering.

When the seedlings are larger I will remove the covers and put up a circular wire support for the plants, fingers crossed!

I also planted basil and marigold seeds around the edges of the tomato bed.

The Kitchen Garden has also had a kaffir lime bush and some sunflowers added to the South-Western corner.

Looking forward to posting updated photos when everything starts growing!! :)

The Cannoli Tower...YUM!!!!

My gorgeous friend Helen found a picture of a seriously impressive cannoli tower online and asked if anyone wanted to help her to make one. It looked pretty damn good to me so I put my hand up.

Neither of us really looked into what it entailed until the day before when I was shopping for the ingredients and read through the instructions. Even then, we had no idea that the whole thing would take almost all day to make!

Most recipes called for the use of metal cannoli tubes to make the pastry shells, but not being in an area with a handy Italian cookware store, I had to find an alternative. So I kept looking and found a recipe that suggested using wrapping the pastry shells around canneloni pasta tubes whilst they were deep fried. Perfect!

We started out making the custard, half vanilla and half choc as we'd seen in the lovely little patisseries. We followed this recipe from Master Chefette which worked out well:  http://www.themasterchefette.com/2012/12/cannoli-with-crema-di-pasticceria.html

Then for the pastry cases. We followed this recipe by Kim D on food.com: http://www.food.com/recipe/cannoli-95546
....however, we found that there was about another half a cup of white wine necessary to make the mixture look like anything approaching pastry. We popped it in the fridge to cool and had lunch.

We found another good suggestion online, using a pasta machine to roll out the pastry. Since I had one handy, we set it up and started to cut out the rounds.


....then we had to wrap them around canneloni shells, making sure that they were thoroughly floured, or they stuck to the pasta once cooked.


So, yes, there was wine used in the pastry and that isn't oil the cases are deep frying in, it's lard... aka pig fat...yep, serious health food here.


We had to let the pastry cases cool a little before attempting to take out the canneloni tubes.


We cooled them on a rack before piping in the custard and....


VOILA!! A delicious cannoli tower....at about 5pm! Phew!! What an effort :)