Wednesday, 30 September 2015

Super Duper Easy Chorizo Soup & Homemade Bread

A while ago I posted the recipe and method for making your own bread:
http://erinsthoughtson.blogspot.com.au/2013/11/homemade-bread.html

This is the cheat's way with the little packet of dried yeast, not with a sourdough starter made from scratch, I'll try that one another day...

The second rise, the top of the fire is a perfect warm spot!
Since then I've also discovered that kids enjoy making bread as it is almost like playdough. They can form their portion into whatever shape they like but then there's the added benefit of baking & eating it too!

Here is our latest example- my very boring long loaf (before rising) and my daughter's pretty awesome figure of a girl, complete with hair, eyes and fingers.

My daughter's bread- a girl and a small bun.


The baked bread, including dismembered 'girl' in a chorizo soup bath...


I thought I'd also share the perfect companion recipe for fresh bread; delicious, quick and simple Chorizo Soup.

My family loves this delicious soup and it is so easy as it has only 5 ingredients and takes just 10 minutes to make:

CHORIZO SOUP RECIPE (makes 3 large bowls)

Ingredients:
Product image
- 2 chorizo
- 1 tin of tomatoes- I like to use Val Verde 'Gourmet'
- I tin of chickpeas- I like Edgell as they have a nice consistency
- 3-4 cloves of garlic, minced or finely chopped
- a good handful of continental parsley
- salt and cracked black pepper to taste (if needed at all)

Method:

1- Slice the chorizo thinly (about 2mm) on a slight angle- add to a frying pan on high heat (don't worry about adding oil as plenty of grease will come out of the chorizo as they cook).
2- turn over each slice of chorizo to brown slightly on each side
3- add crushed garlic to the pan- allow to brown slightly, about 1 minute
4- add tomatoes to the pan- let this cook for a couple of minutes, stirring
5- fill the empty tomato tin with water and add that to the pan
6- drain and rinse chickpeas (rinse properly) and add them too
7- wash and chop the parsley and add that too
8- bring to the boil for a minute or so then serve
9- season with salt and pepper if you need to, but the chorizo generally have plenty of flavour.

YUM!!

You can substitute chickpeas for berlotti beans, parsley for basil or add a chopped rasher or two of bacon to bulk it up. 

This serves 3 very nicely, but you can easily double the recipe for extra serves.

Thursday, 24 September 2015

Re-purposing in the Garden


The jet ski pallets
Ok, so I am not generally a fan of buying new building materials.

With so many things out there in the world already, with a bit of imagination, you can often turn something someone else doesn't want into something you can use.

I am always happy to scan the freebie websites, grab something off the side of the road or take things friends and family are chucking out, and make them into things I can use.

I thought I'd post a few examples with pics of what I've used in the garden.

The first (and definitely the most difficult) were the garden beds. These started life as shipping containers for jet skis. A motorcycle & jet ski shop posted them on Gumtree for free and I immediately saw them as garden beds.

The trouble started when my husband & I went to collect them. Not only were they too big to fit in our large box trailer, they were so heavy (about 50kg) the two of us needed some help to get them on top of the trailer and strap them down.

I drove them home like this (about 130km) and then accepted the help of a neighbour with forks on the tractor to lift them off the trailer and get them into a paddock where I intended to use them. They sat there for a month and a half until I eventually decided I wanted to use them in the kitchen garden after all.

I managed to strip all the internal timber from one pallet using a handsaw, nearly doing my back a damage in the process, and then asked a friend with a chainsaw to do the other two (which she managed in about 10 minutes as opposed to my hour and a bit!).

We dragged the wretched things into the the kitchen garden, my husband and I knocked & unbolted the last bits of wood from the frames and dug them into place.

OMG, what a mission! I would have been better off just knocking together garden beds out of the timber laying around in the shed, but anyhoo, it's done now.

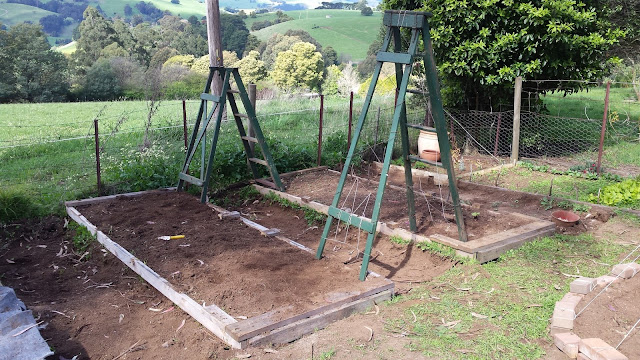
Garden beds in place, carpet used to kill weeds, old ladders used as climbing frames for plants.
And they DO make really great garden beds. I even used the bits of carpet off these pallets to lay on certain areas of the garden to kill the weeds.

But it's not always this tricky. I needed some arches/climbing frames for my climbing veggies, so I dragged two rotten old ladders out of the hayshed, dusted them off, used some wire and string to create a net of sorts and dug the legs into place.

Old ladders given a new life.
Hopefully, these will have zucchini and cucumbers growing up them in no time.

Some more simple examples are the used bricks my mother-in-law had lying around. These have made decorative edging for more garden beds and the border around the bean teepee (so far). 

And of course, eggshells should not be wasted whilst you have lettuce growing (or any other plants that attract slugs and snails). 

Save them up and, once they're dry, crush them finely and sprinkle them liberally around your plants. I asked a mini helper with tiny gumboots to stomp on them for me and was told it was fun :) 

And of course, why buy fancy tags/naming stakes for your veg when you have sticks, a stanley knife and a permanent marker on hand? 
Just shave off the end, write whatever type of seed you have planted on the white bit and stick it in the ground. Perfect.

Sometimes re-purposing turns out to be more trouble than it's worth, but not very often. It's a great way to use what you have, save stuff from going into landfill, save cash and engage your creativity, all at once.


Sunday, 20 September 2015

The Bean Teepee- Edible Cubby!

Dig in a large stick.
Found this great idea in Millie Ross's book, The Thrifty Gardener:

A Bean Teepee Cubby!

The idea is to grow your beans in a teepee shape.

This gives your beans something to climb up and your kids somewhere to play whilst you're working in the garden.

First, mark out a 2x2m square space.

Find a large stick- have a look at your local park for one that has fallen from a tree and trim off all the smaller branches with a pruning saw.

Dig a 50cm deep hole to bury it in so it is nice and solid.

Dig a circular mound about 1 metre out from the stick all the way around, working in some compost.

Form a mound about 1 metre out from the stick in a circle.

Form a Teepee shape with the strings.
Tie a doubled-over length of string around a brick and put it on the ground outside the mound- Millie suggests plastic string as jute string can rot under the bricks, but we only had cotton string so we'll have to take our chances! You can use tent pegs of you don't have bricks.

Continue this around the stick to form a teepee frame, leaving about 40-50cm between each string and leaving a space for a doorway.

Soak the beans in water overnight. We used 2 different types for some variety and a longer growing season- 'Dutchdry pole beans' from The Briars' collection of heritage seeds, and an interesting one from the Digger's club called 'Sex Without Strings'.


Dutch Dry Pole Beans

Plant 2 or 3 beans at the base of each string and water in, but don't water again after that until you see a sprout.

Sex Without Strings from the Diggers' heritage collection.
The little plants might need a bit of help to find the string, so you might need to use a twig to prop them up a little and guide them onto the string but after that they should climb up the string all by themselves.

Once you have a healthy 10cm plant, pull out the smallest ones and just leave the one strongest looking plant at the bottom of each string.

For a bit of extra fun, I planted some Marigold 'Red Marietta' seeds in the gap between each string.

This means there should be pretty little red and yellow flowers around the base of the cubby too.

I'm not sure when we'll have a cubby covered in beans but the packet says 9 weeks til harvest.

I'll post again with pictures when we do!


Wednesday, 16 September 2015

Spring has sprung!


Some type of magnolia?
Spring is finally here and it is such an exciting time in the garden!


Not only is is time to plant so many vegetables, but there are flowers popping up out of nowhere on what seems like a daily basis.
Some kind of giant camelia
Our own red carpet..


The previous owners of our house obviously enjoyed gardening and have planted so many amazing things, many of which I cannot identify.

Mystery Orchid...
A pretty little blue flower (?)
Freesias
I was delighted to discover orchids in the garden the other day, the freesias are blooming and smell incredible and there is an amazing tree filled with yellow flowers near the water tank...
Yellow flowers covering a tree
Not sure what it is.


A green-thumbed friend of mine believes that these are some kind of insect-eating plant...


Tuesday, 15 September 2015

Growing Native Bush Spices- Niche Market

Bush Spices
As you can imagine, starting an organic farm has put me on a steep learning curve. I might have signed up to a lengthy and expensive course in horticulture, but instead I have been seeking out as many cheap and free short courses as I can to learn what I need to make this lifestyle venture successful.

Courses have been available via the Digger's Club for a small fee, or for free via libraries, councils and various community groups.
Leonie Parker

In the last 11 months, I have completed short courses in:
- Superadobe natural building
- Keeping chickens
- Starting a successful small business
- Growing a Kitchen Garden
- Moon Planting
- Sowing Garlic
- Soil Health
- Composting & Worm Farms
- Grant Application Writing
- Citrus Growing and Care
- Using Social Media in your business.
- Growing Native Australian Bush Spices for Market

I have courses in Event Planning, Beekeeping and Growing Australian Native Plants from Seed coming up within the next month and really looking forward to those.

Here are some pics from the Growing Native Australian Bush Spices for Market course, held at Leongatha library by Leonie Parker from Brushtail Bush Foods.

She shared pictures showing the transformation of her 40 acre property in Gippsland from paddocks to a garlic and passion fruit growing venture (which didn't work out) to a much more successful venture growing native bush spices.

Mountain Pepper

Some of the most successful plants she has grown are Mountain Pepper, of which both the berries and leaves can be harvested for use just like conventional pepper, Strawberry Gum and Round Leaf Mint.

Round Leaf Mint
These are sold to chefs, companies who turn them into value-added products such as syrups and spice mixes and at Farmer's Markets as dried spices.

The downside is that you need to harvest quite a lot of the raw product to end up with relatively little dried spice (1kg of harvested mountain pepper leaves will yield 300grams of dried spice) .

The upside is that there is no need to use any kind of pesticide, herbicide or fertilizer, due to the fact that these are native plants.

I am seriously considering adding some of these plants to our property.

Lemon Myrtle (left) and Warrigal Greens (right)


Friday, 11 September 2015

The new lawnmowers!

Dalgo (front) is a young pinto, and Mr Horse (rear) is an elderly thoroughbred ex-racehorse.
We've been here for four and a half months now and it really is starting to feel like home. At first it felt rather isolated, it is a 15 minute drive to the nearest town and that is a big adjustment for someone who has spent the majority of my adult life living in city apartments!
However, we have started to meet a few of our neighbours and have realised how incredibly friendly and welcoming everyone is around here.

The general impression is that country people are helpful, generous and support each other. Well, it's all true. When we first moved in our neighbours across the road came over with a wheelbarrow-load of wood because it was winter and we may not have arranged firewood.

Since then, we have shared plenty of cups of coffee, swapped advice and various baked delights and been extremely thankful when someone has offered the use of a machine or piece of equipment that they have to make a particular task easier. The gorgeous border-collie cross kelpie farm dog who lives on the property down the hill visits every day to play with our daughter, every time you drive past someone they wave. It's fantastic.

The new lawnmowers...

Recently I came home to a note on the front door from a neighbour we hadn't yet met, asking if we'd be interested in agisting some of her horses. We have 11.5 acres and no animals to eat the grass, so we agreed and now we have two very friendly, beautiful lawnmowers that come and greet us whenever we go outside.